Thinking about selling in Edmonds and want your home to pop online and in person? You’re not alone. Buyers here notice views, light, and lifestyle, and the right staging helps them see your home as the one. In this guide, you’ll learn high-ROI steps tailored to Edmonds’ coastal light, neighborhood styles, and photo timing so you can prep with confidence. Let’s dive in.
Why staging in Edmonds is different
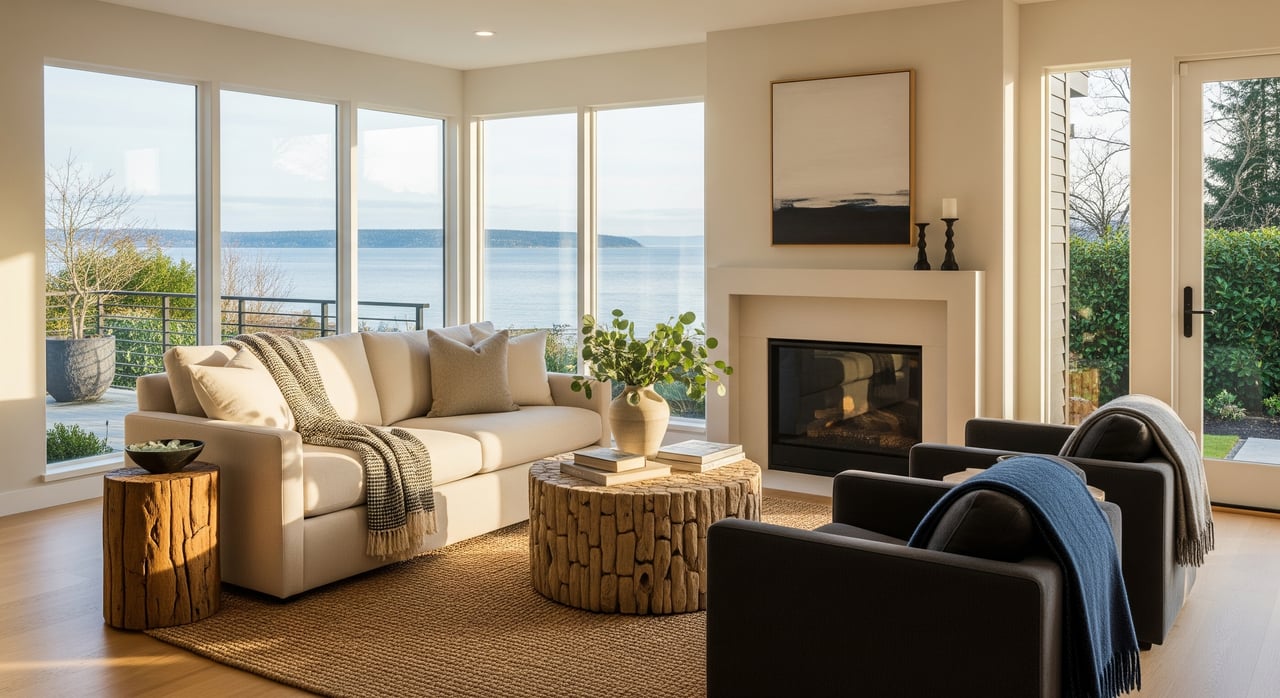
Edmonds buyers often look for walkability to downtown, the waterfront and ferry, parks, and homes with character. If your property offers any of these, staging should spotlight them. For condos and downtown listings, show convenient living and smart use of space. For single-family homes in the Bowl or along view corridors, foreground the view and outdoor living.
Local architecture also shapes staging choices. Craftsman-era bungalows and cottages shine when you preserve period trim and built-ins while using neutral finishes so buyers can visualize updates. Mid-century ramblers read best with clean lines and furniture that fits scale. Waterfront and view homes benefit from minimal window coverings and furniture arrangements that face the vista.
Finally, consider Edmonds’ coastal light. Overcast days are common, which can make interiors look flat if lighting and textures are off. Warm, layered textures and well-chosen artificial lighting create inviting photos and showings. When skies clear, take advantage of the contrast between water and mountains, or use twilight to capture mood and glow.
High-ROI staging priorities
Declutter and deep clean first
Start with the fastest wins. Remove personal photos, extra decor, and visible hobby gear. Clear counters and flat surfaces. Deep clean carpets, bathrooms, appliances, and most of all, windows. Clean glass is essential for view homes because it sharpens both photos and showings.
Refresh with neutral paint and small fixes
Opt for warm-toned neutrals that read well in soft coastal light. Very cool grays can look cold on cloudy days. Address small repairs like caulk, grout, squeaky hinges, and outdated switch plates or hardware. These details reduce the sense of “work” for buyers.
Light to flatter coastal conditions
Use daylight-balanced LED bulbs where appropriate and add lamps for layered light in living rooms and bedrooms. Keep entry and paths well lit for evening showings. Good lighting adds warmth in photos and helps rooms feel larger and more welcoming.
Boost curb appeal and entry
Pressure wash siding and walks, clean gutters, and refresh or replace the front door hardware if needed. Add a tidy doormat and a simple potted plant. For waterfront or view properties, clean decks and railings and stage a welcoming seating area to suggest daily use.
Stage the rooms that sell
Focus on the living room, kitchen and dining, primary bedroom, and outdoor living spaces. If your budget is tight, consider a consultation-based approach where you provide items with guidance from a stager. These key areas drive buyer decisions, both online and in person.
Manage landscaping and reveal the view
Trim vegetation that blocks sightlines and long views, and add low-maintenance, coastal-tolerant potted plants where a lift is needed. Always check local rules before altering any protected or public trees. Even partial view improvements can change how buyers perceive a home.
Photo-forward styling that sells the view
Pre-photo staging checklist
- Remove visual clutter and hide cords, bins, and fridge magnets.
- Make crisp beds with layered linens and add minimal tabletop decor.
- Clean every window and position shades to show the view without harsh backlight.
- Clear and stage patios with simple seating for two to four people.
Timing and shot list that work in Edmonds
- Aim for a bright day for interiors. For strong water or skyline interest, consider twilight to capture reflections and neighborhood glow.
- Interior timing often works best late morning to early afternoon on clear days.
- For water and mountain shots, try midday for maximum clarity, or golden hour for warmth.
- Essential imagery: wide shots of living, kitchen, dining, and primary bedroom; framed view shots from main rooms; exterior context showing proximity to downtown or the waterfront when allowed; drone or aerial when appropriate and permitted.
Styling details that photograph well
- Favor texture over busy patterns. Think tactile throws, layered rugs, natural wood, and stone.
- Add pops of warm color like mustard, terracotta, or warm blue to balance cool coastal light.
- Match furniture scale to the room so spaces feel complete without blocking flow or views.
- Keep floors and sightlines clear to lead the eye toward windows and outdoor spaces.
Downtown, the Bowl, and view corridor tips
Downtown Edmonds
Emphasize walkability and flexible living. Stage a small office nook if space allows and highlight storage solutions. Keep balcony furniture compact and low-maintenance so outdoor space feels usable without clutter.
The Bowl
Homes here often feature terraced yards and layered sightlines. Define zones with rugs and furniture so open plans feel intentional. Ensure outdoor steps, railings, and lighting are clean and safe for twilight showings.
View corridors
Always orient seating toward the view in key rooms. Minimize heavy window treatments and consider top-down shades for privacy without losing the vista. Trim plantings that block sightlines if allowed. For partial views, a simple bistro setup or telescope on a deck can suggest how buyers might enjoy the outlook.
Your 1 to 4 month prep plan
Month 4: Plan and line up pros
- Meet with your agent and a staging consultant. Review local portfolios so you know what the finished product can look like.
- Gather quotes for paint, repairs, landscaping, and staging.
- Reserve a photographer within a 1 to 2 week window after staging installation.
Month 3: Big fixes and any permit checks
- Paint the main living areas and complete larger repairs like flooring or counters if planned.
- Ask the city about any rules for tree trimming, historic homes, or exterior changes that could need approval.
- Begin decluttering and arrange off-site storage if you need space.
Month 2: Deep clean, lighting, and landscaping
- Finish deep cleaning. Replace bulbs and add lamps based on the lighting plan.
- Pressure wash, refresh beds, tighten deck boards, and clean railings.
- Lock in the staging delivery date, leaving at least one full day for photography afterward.
4 to 14 days before photos and listing
- Install staging, style each room, and do a final walkthrough.
- Complete photography, including exterior, view, twilight, and drone if using.
- Order floor plans or virtual tours if part of your plan.
Day of listing and showings
- Keep surfaces clear and beds made.
- Open curtains or shades to reveal views.
- Turn on all lights and ensure entryways are inviting.
Vendor coordination tips
- Use your agent as the hub so painters, stagers, landscapers, cleaners, and the photographer move in sequence.
- Ask vendors for before and after photos to confirm scope completion.
- For staging rentals, confirm delivery, setup, and pickup windows to avoid extra charges.
Budget guidance
- Consultation-only staging is the most budget-friendly.
- Partial staging of key rooms offers a balanced cost-to-impact option.
- Full-home staging for vacant properties carries a higher monthly cost and delivery fees.
- Photographers may charge additional for drone or twilight sessions. Request itemized estimates and review change and cancellation policies.
Quick seller checklists
Photo-day essentials
- Windows spotless and shades adjusted to show views
- All surfaces cleared, cords hidden, and beds layered
- Patio and deck furniture clean and staged
- All lights on and bulbs consistent in color temperature
Open-house readiness
- Entry swept, doormat fresh, and porch light on
- Counters clear and trash bins tucked away
- Curtains and blinds open to highlight light and views
- A simple vase, bowl, or plant as a warm finishing touch
Ready to list with less stress?
Smart, local staging helps buyers see themselves in your home and puts your best features front and center. If you want white-glove coordination, professional photography, and a plan tailored to your property’s style, views, and location, connect with an experienced local advisor. Reach out to Lynette Thomas to get a free valuation and a personalized marketing plan.
FAQs
What staging matters most for an Edmonds view home?
- Prioritize clean windows, minimal window treatments, furniture oriented to the view, and simple outdoor seating. Trim vegetation if allowed to recover sightlines.
How should I pick paint colors for Edmonds’ coastal light?
- Choose warm neutrals that feel inviting on overcast days and avoid very cool grays. Test swatches in natural light before committing.
When is the best time to schedule listing photos in Edmonds?
- Aim for a bright day late morning to early afternoon for interiors, and consider twilight for mood shots. Book your photographer after staging is fully installed.
Which rooms should I stage if my budget is limited?
- Focus on the living room, kitchen and dining, primary bedroom, and outdoor living areas. These spaces influence buyer decisions the most.
How do I handle privacy while showcasing a view?
- Use minimal or top-down window treatments, position seating toward the view, and rely on landscaping trims that maintain sightlines while screening where needed.
Do I need permits to trim trees that block my view in Edmonds?
- Possibly. Check local rules before altering any public or protected trees, and consult your agent if you are unsure which guidelines apply.